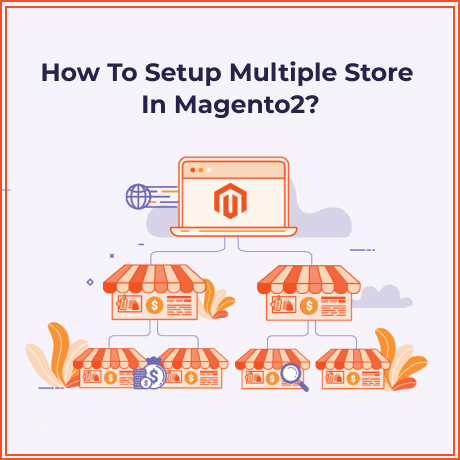
Many eCommerce stores begin as a single store selling particular products or services. Over a period time, when the business expands, they may have more than one product line. They may also expand to other lucrative geographies.
In such cases, there arises a need for multiple websites for the company. Instead of having multiple websites, vendors can have multiple stores with same/different domains using the multi-store feature of Magento. Magento allows the merchant to create multiple stores and store views.
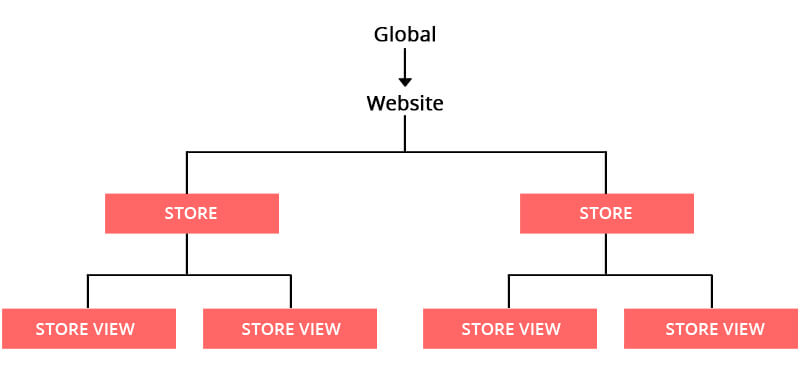
Below is the global website store methodology as defined in “Learning Magento 2 Administration” by Bret Williams & Cyndi Williams.
Global – Global refers to any configuration or setting that affects the entire Magento installation. Some settings such as security, product SKUs, and logging apply to all stores.
Website – Website is akin to a business entity as many of the settings made at this level pertain to payment gateways, shipping, taxes, and so on.
Store – Store is the level where you assign a particular product catalog. It is at this level that we begin differentiating stores by the products offered.
Store View – Store Views are mostly used to handle different languages on your website. You will typically have one Store View per language.
STEP 1
: TO CREATE A NEW WEBSITE
Login to Magento Backend
-
- Click Store > Settings > All Stores.
- On the Stores page, click Create Website.
- Name: Enter your website name.
- Code: Enter a unique code for the website.
- Sort Order: It is an optional field and is set to maximum value ‘0’ by default.
- Then Save Web Site.

STEP 2
: TO CREATE A NEW STORE
-
- Cick Store > Settings > All Stores.
- On the Stores page, click Create Store.
-
- Choose the Website of your choice.
- Name the Store.
- Choose the Root Category that needs to be displayed within that store.
To add a new root category follow the steps below.- Go to Product > Categories.
- Click Add Root Category in the left column of the page.
- Enter the Category Name, enable the category and Save the changes.
-
- Click Save Store.

STEP 3
: TO CREATE A NEW STORE VIEW
-
- Click Store > Settings > All Stores.
- On the Stores page, click Create Store View.
- Choose the Store of your choice.
- Name the Store View.
- Set the status Enabled.
- Status is an optional field and is set to maximum value ‘0’ by default.
- Click Save Store View.

STEP 4
: TO CHECK FOR MODE AND ACCESS PERMISSIONS
Note: This step is for the beginners in Magento 2. If you have not changed to any mode previously then you are set to be in the default mode. To configure multi store view, you have to change to the developer mode by following these steps.
- Give permissions to the below directories.
- chmod -R a+wX var
- chmod -R a+wX app/etc
- chmod -R a+wX pub
- The command to change the mode is,
- bin/magento deploy:mode:set developer
Another way to enable developer mode is,
- Goto app/etc/ and open env.php
- and change current application mode by MAGE_MODE’ => ‘default’ to MAGE_MODE’ => ‘developer’.
STEP 5
: TO CREATE A NEW WEBSITE
-
-
- Copy the index.php file and .htaccess file from the Magento root directory to the directory created for the new website within the magento root directory.
- Replace the code of index.php into the following code snippet.
- Before:
<?php /** * Application entry point * * Example - run a particular store or website: * -------------------------------------------- * require __DIR__ . '/app/bootstrap.php'; * $params = $_SERVER; * $params[\Magento\Store\Model\StoreManager::PARAM_RUN_CODE] = 'website2'; * $params[\Magento\Store\Model\StoreManager::PARAM_RUN_TYPE] = 'website'; * $bootstrap = \Magento\Framework\App\Bootstrap::create(BP, $params); * \/** @var \Magento\Framework\App\Http $app *\/ * $app = $bootstrap->createApplication('Magento\Framework\App\Http'); * $bootstrap->run($app); * -------------------------------------------- * * Copyright © 2013-2017 Magento, Inc. All rights reserved. * See COPYING.txt for license details. */ try { require __DIR__ . '/app/bootstrap.php'; } catch (\Exception $e) { echo <<<HTML <div style="font:12px/1.35em arial, helvetica, sans-serif;"> <div style="margin:0 0 25px 0; border-bottom:1px solid #ccc;"> <h3 style="margin:0;font-size:1.7em;font-weight:normal;text-transform:none;text-align:left;color:#2f2f2f;"> Autoload error</h3> </div> <p>{$e->getMessage()}</p> </div> HTML; exit(1); } $bootstrap = \Magento\Framework\App\Bootstrap::create(BP, $_SERVER); /** @var \Magento\Framework\App\Http $app */ $app = $bootstrap->createApplication('Magento\Framework\App\Http'); $bootstrap->run($app); - After:
<?php
/**
 * Application entry point
 *
 * Example - run a particular store or website:
 * --------------------------------------------
 * require __DIR__ . '/app/bootstrap.php';
 * $params = $_SERVER;
 * $params[\Magento\Store\Model\StoreManager::PARAM_RUN_CODE] = 'website2';
 * $params[\Magento\Store\Model\StoreManager::PARAM_RUN_TYPE] = 'website';
 * $bootstrap = \Magento\Framework\App\Bootstrap::create(BP, $params);
 * \/** @var \Magento\Framework\App\Http $app *\/
 * $app = $bootstrap->createApplication('Magento\Framework\App\Http');
 * $bootstrap->run($app);
 * --------------------------------------------
 *
 * Copyright © 2013-2017 Magento, Inc. All rights reserved.
 * See COPYING.txt for license details.
 */

try {
    require '../app/bootstrap.php';
} catch (\Exception $e) {
    echo <<<HTML
<div style="font:12px/1.35em arial, helvetica, sans-serif;">
    <div style="margin:0 0 25px 0; border-bottom:1px solid #ccc;">
        <h3 style="margin:0;font-size:1.7em;font-weight:normal;text-transform:none;text-align:left;color:#2f2f2f;">
        Autoload error</h3>
    </div>
    <p>{$e->getMessage()}</p>
</div>
HTML;
    exit(1);
}

$params = $_SERVER;
    $params[\Magento\Store\Model\StoreManager::PARAM_RUN_CODE] = 'french';
    $params[\Magento\Store\Model\StoreManager::PARAM_RUN_TYPE] = 'website';
    $bootstrap = \Magento\Framework\App\Bootstrap::create(BP, $params);
    $app = $bootstrap->createApplication('\Magento\Framework\App\Http');
$bootstrap->run($app);
- Before:
- In the Admin, click Stores > Settings > Configuration > General > Web.
- From the Store View listed on the top of the page, choose a website, other than the default website.
- In the right panel, expand Base URLs. Unselect Use Default. Consider the following as examples to fill the fields.
- Base URL : http://localhost/magento/newstore/
- Base Link URL : http://localhost/magento/newstore/
- Base URL for Static View Files(default value) : http://localhost/magento/pub/static/
- Base URL for User Media Files(default value) : http://localhost/magento/pub/media/
-
Fill the same in the fields under Base URLs (Secure) if needed for ‘https’ access.
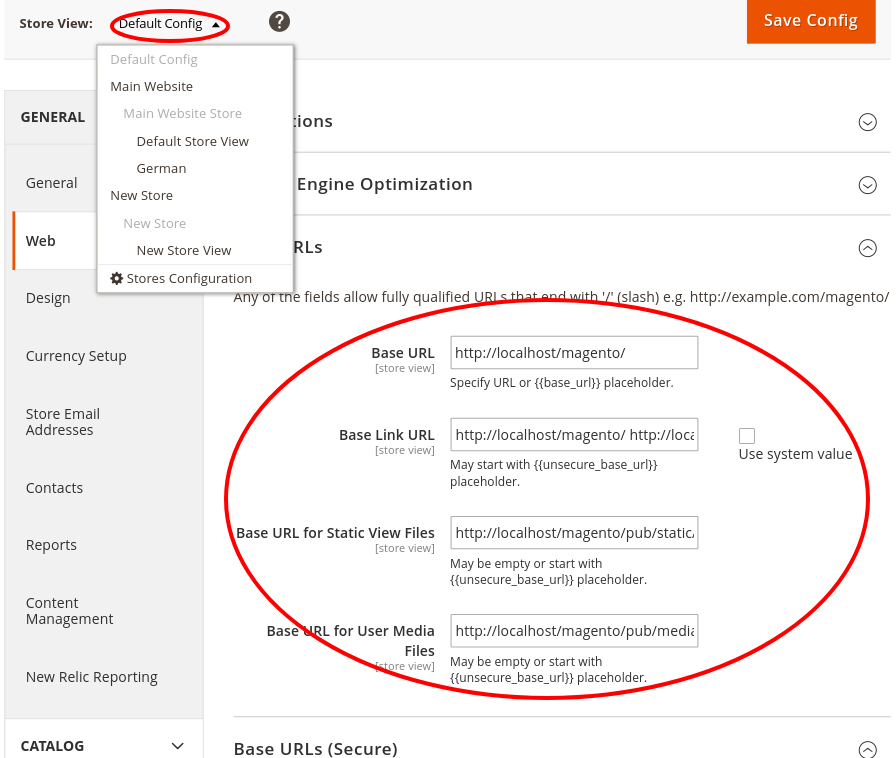
- Click Save Config.
- Click Flush Magento Cache under System > Tools > Cache Management for better results.
- Now you can view the different stores and the store views in the browser by specifying the corresponding URLs.
To integrate a language pack to differentiate the store views with various languages:
Step 1:
Goto Find Partners & Extensions in the Admin Panel.
Step 2:
Click Visit Magento Marketplace in the right bottom of the page.
Step 3:
Search for the extension you need.
Step 4:
Download the extension and unzip and extract the content into the specified magento root directory.
Step 5:
Refer the documentation and steps given by the extension team and complete the process.
Example extension : Magenerds – de_de for german language pack.
Refer http://doc.magenerds.com/german-language-pack/ for the above extension integration.
Hope the blog was useful. Let us know your feedbacks and comments.
Recommended Posts
Top Most Useful CMS Tools For Creating Websites
September 12, 2024

How To Achieve Over 100% Speed Improvement In Magento 2
August 6, 2024
Magento 2 Backend Not Working How To Solved?
July 13, 2024